Some times in your application , if you wanted to ask the user about
taking a decision between yes or no in response of any particular action
taken by the user, by remaining in the same activity and without
changing the screen, you can use Alert Dialog.
In order to make an alert dialog , you need to make an object of AlertDialogBuilder which an inner class of AlertDialog. Its syntax is given below
After creating and setting the dialog builder , you will create an
alert dialog by calling the create() method of the builder class. Its
syntax is
To experiment with this example , you need to run this on an emulator or an actual device.
Here is the modified code of src/com.example.alertdialog/MainActivity.java
Here is the default code of AndroidManifest.xmlIn order to make an alert dialog , you need to make an object of AlertDialogBuilder which an inner class of AlertDialog. Its syntax is given below
AlertDialog.Builder alertDialogBuilder = new AlertDialog.Builder(this);Now you have to set the positive (yes) or negative (no) button using the object of the AlertDialogBuilder class. Its syntax is
alertDialogBuilder.setPositiveButton(CharSequence text, DialogInterface.OnClickListener listener)
alertDialogBuilder.setNegativeButton(CharSequence text, DialogInterface.OnClickListener listener)
Apart from this , you can use other functions provided by the builder class to customize the alert dialog. These are listed below
| Sr.No | Method type & description |
|---|---|
| 1 | setIcon(Drawable icon) This method set the icon of the alert dialog box. |
| 2 | setCancelable(boolean cancelable) This method sets the property that the dialog can be cancelled or not |
| 3 | setMessage(CharSequence message) This method sets the message to be displayed in the alert dialog |
| 4 | setMultiChoiceItems(CharSequence[] items, boolean[] checkedItems, DialogInterface.OnMultiChoiceClickListener listener) This method sets list of items to be displayed in the dialog as the content. The selected option will be notified by the listener |
| 5 | setOnCancelListener(DialogInterface.OnCancelListener onCancelListener) This method Sets the callback that will be called if the dialog is canceled. |
| 6 | setTitle(CharSequence title) This method set the title to be appear in the dialog |
AlertDialog alertDialog = alertDialogBuilder.create();
alertDialog.show();
This will create the alert dialog and will show it on the screen.
Example
The following example demonstrates the use of AlertDialog in android. It uses three different activities to demonstrate it. The dialog asks you to jump to positive activity or negative activity or cancel it.To experiment with this example , you need to run this on an emulator or an actual device.
| Steps | Description |
|---|---|
| 1 | You will use Eclipse IDE to create an Android application and name it as AlertDialog under a package com.example.alertdialog. While creating this project, make sure you Target SDK and Compile With at the latest version of Android SDK to use higher levels of APIs. |
| 2 | Modify src/MainActivity.java file to add alert dialog code to launch the dialog. |
| 3 | Modify layout XML file res/layout/activity_main.xml add any GUI component if required. |
| 4 | Create a new activity called PositiveActivity and confim it by visiting src/PositiveActivity.java. |
| 5 | Modify layout XML file of the newly created activity res/layout/activity_positive.xml add any GUI component if required. |
| 6 | Create a new activity called NegativeActivity and confim it by visiting src/NegativeActivity.java. |
| 7 | Modify layout XML file of the newly created activity res/layout/activity_negative.xml add any GUI component if required. |
| 8 | Modify res/values/strings.xml to define required constant values |
| 9 | Run the application and choose a running android device and install the application on it and verify the results. |
package com.example.alertdialog;

import com.example.alertdialog.*;

import android.os.Bundle;
import android.app.Activity;
import android.app.AlertDialog;
import android.content.DialogInterface;
import android.content.Intent;
import android.view.Menu;
import android.view.View;

public class MainActivity extends Activity {

   @Override
   protected void onCreate(Bundle savedInstanceState) {
      super.onCreate(savedInstanceState);
      setContentView(R.layout.activity_main);
   }

   public void open(View view){
      AlertDialog.Builder alertDialogBuilder = new AlertDialog.Builder(this);
      alertDialogBuilder.setMessage(R.string.decision);
      alertDialogBuilder.setPositiveButton(R.string.positive_button,
      new DialogInterface.OnClickListener() {

         @Override
         public void onClick(DialogInterface arg0, int arg1) {
            Intent positveActivity = new Intent(getApplicationContext(),com.example.alertdialog.PositiveActivity.class);
            startActivity(positveActivity);

         }
      });
      alertDialogBuilder.setNegativeButton(R.string.negative_button,
      new DialogInterface.OnClickListener() {

         @Override
         public void onClick(DialogInterface dialog, int which) {
            Intent negativeActivity = new Intent(getApplicationContext(),com.example.alertdialog.NegativeActivity.class);
            startActivity(negativeActivity);
   }
      });

      AlertDialog alertDialog = alertDialogBuilder.create();
      alertDialog.show();

   }

   @Override
   public boolean onCreateOptionsMenu(Menu menu) {
      // Inflate the menu; this adds items to the action bar if it is present.
      getMenuInflater().inflate(R.menu.main, menu);
      return true;
   }
}
Here is the default code of src/com.example.alertdialog/PositiveActivity.java
package com.example.alertdialog;

import android.os.Bundle;
import android.app.Activity;
import android.view.Menu;

public class PositiveActivity extends Activity {

   @Override
   protected void onCreate(Bundle savedInstanceState) {
      super.onCreate(savedInstanceState);
      setContentView(R.layout.activity_positive);
   }

   @Override
   public boolean onCreateOptionsMenu(Menu menu) {
      // Inflate the menu; this adds items to the action bar if it is present.
      getMenuInflater().inflate(R.menu.positive, menu);
      return true;
   }

}
Here is the default code of src/com.example.alertdialog/NegativeActivity.java
package com.example.alertdialog;

import android.os.Bundle;
import android.app.Activity;
import android.view.Menu;

public class NegativeActivity extends Activity {

   @Override
   protected void onCreate(Bundle savedInstanceState) {
      super.onCreate(savedInstanceState);
      setContentView(R.layout.activity_negative);
   }

   @Override
   public boolean onCreateOptionsMenu(Menu menu) {
      // Inflate the menu; this adds items to the action bar if it is present.
      getMenuInflater().inflate(R.menu.negative, menu);
      return true;
   }

}
Here is the modified code of res/layout/activity_main.xml
xmlns:android="http://schemas.android.com/apk/res/android"
xmlns:tools="http://schemas.android.com/tools"
android:layout_width="match_parent"
android:layout_height="match_parent"
android:paddingBottom="@dimen/activity_vertical_margin"
android:paddingLeft="@dimen/activity_horizontal_margin"
android:paddingRight="@dimen/activity_horizontal_margin"
android:paddingTop="@dimen/activity_vertical_margin"
tools:context=".MainActivity" >
 xmlns:android="http://schemas.android.com/apk/res/android"
   xmlns:tools="http://schemas.android.com/tools"
   android:layout_width="match_parent"
   android:layout_height="match_parent"
   android:paddingBottom="@dimen/activity_vertical_margin"
   android:paddingLeft="@dimen/activity_horizontal_margin"
   android:paddingRight="@dimen/activity_horizontal_margin"
   android:paddingTop="@dimen/activity_vertical_margin"
   tools:context=".PositiveActivity" >


      android:id="@+id/textView1"
      android:layout_width="wrap_content"
      android:layout_height="wrap_content"
      android:layout_alignParentLeft="true"
      android:layout_alignParentTop="true"
      android:layout_marginLeft="14dp"
      android:layout_marginTop="20dp"
      android:text="@string/positive"
      android:textAppearance="?android:attr/textAppearanceLarge" />
 xmlns:android="http://schemas.android.com/apk/res/android"
   xmlns:tools="http://schemas.android.com/tools"
   android:layout_width="match_parent"
   android:layout_height="match_parent"
   android:paddingBottom="@dimen/activity_vertical_margin"
   android:paddingLeft="@dimen/activity_horizontal_margin"
   android:paddingRight="@dimen/activity_horizontal_margin"
   android:paddingTop="@dimen/activity_vertical_margin"
   tools:context=".NegativeActivity" >


      android:id="@+id/textView1"
      android:layout_width="wrap_content"
      android:layout_height="wrap_content"
      android:layout_alignParentLeft="true"
      android:layout_alignParentTop="true"
      android:layout_marginLeft="14dp"
      android:layout_marginTop="17dp"
      android:text="@string/negative"
      android:textAppearance="?android:attr/textAppearanceLarge" />
xml version="1.0" encoding="utf-8"?>


    name="app_name">AlertDialog
    name="action_settings">Settings
    name="hello_world">Hello world!
    name="title_activity_positive">PositiveActivity
    name="title_activity_negative">NegativeActivity
    name="positive">Positive Activity
    name="negative">Negative Activity
    name="decision">Are you sure, you wanted to make this decision
    name="positive_button">+ive
    name="negative_button">-ive
xml version="1.0" encoding="utf-8"?>
 xmlns:android="http://schemas.android.com/apk/res/android"
   package="com.example.alertdialog"
   android:versionCode="1"
   android:versionName="1.0" >


      android:minSdkVersion="8"
      android:targetSdkVersion="17" />


      android:allowBackup="true"
      android:icon="@drawable/ic_launcher"
      android:label="@string/app_name"
      android:theme="@style/AppTheme" >

         android:name="com.example.alertdialog.MainActivity"
         android:label="@string/app_name" >

             android:name="android.intent.action.MAIN" />

             android:name="android.intent.category.LAUNCHER" />
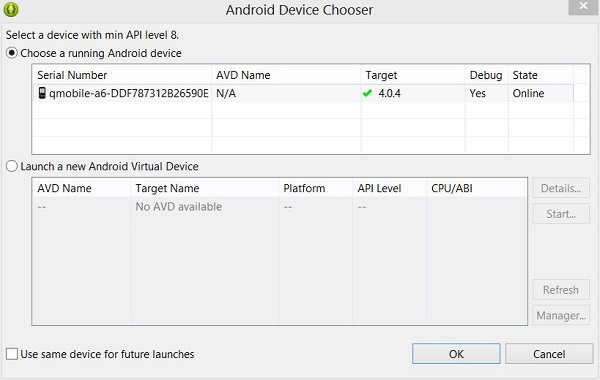
 icon from the toolbar. Before starting your application, Eclipse will
display following window to select an option where you want to run your
Android application.
 Select your mobile device as an option and then check your mobile device which will display following screen:
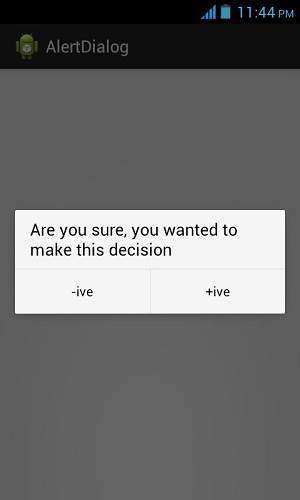
 Now just tap the button hello world to see the alert box , which would be something like this
 Now select any of the two buttons and see the respective activity
loading up. In case you select positve button , this screen would appear
 Now press back button on your device , and this time select negative
from your alert dialog. The following screen would appear this time


